 Materials
Engineering, Inc. recently purchased an Optical Emission Spectrograph
(OES), allowing us to determine the chemical composition of iron,
aluminum and copper based alloys. Our OES, manufactured by Spectro
A. I. is a compact Windows-based unit that incorporates the latest
CCD technology and has small sample size analytical capabilities.
Spectro is recognized as the leader in the manufacture of OES and
other chemical analysis equipment. Materials
Engineering, Inc. recently purchased an Optical Emission Spectrograph
(OES), allowing us to determine the chemical composition of iron,
aluminum and copper based alloys. Our OES, manufactured by Spectro
A. I. is a compact Windows-based unit that incorporates the latest
CCD technology and has small sample size analytical capabilities.
Spectro is recognized as the leader in the manufacture of OES and
other chemical analysis equipment.
How/Why Does It Work?
 Do
you remember having a bag of special "rocks" that your dad
threw into the camp fire or fireplace that made the fire turn yellow,
green or blue in color? Well, that is the basic principal on which
Optical Emission Spectroscopy is based. When heated in a flame, each
element radiates a characteristic set of spectral lines, each at a
distinctive frequency. When these spectral lines lie within the visible
light spectrum, we see colors. However, most of the spectral lines
lie outside of the visible range of the spectrum and require a system
a little more complicated than a fire to provide engineering information. Do
you remember having a bag of special "rocks" that your dad
threw into the camp fire or fireplace that made the fire turn yellow,
green or blue in color? Well, that is the basic principal on which
Optical Emission Spectroscopy is based. When heated in a flame, each
element radiates a characteristic set of spectral lines, each at a
distinctive frequency. When these spectral lines lie within the visible
light spectrum, we see colors. However, most of the spectral lines
lie outside of the visible range of the spectrum and require a system
a little more complicated than a fire to provide engineering information.
 Back
in the mid 1800ís, scientists explored this 'colored fire'
phenomena, diffracting the light from the flame using a prism and
creating a series of spectral lines. The lines were measured, with
their wavelength/frequency calculated from the diffraction geometry
and used this information to learn about the energy states of the
electron shells. Spectrographs were one of the first tools used to
characterize the atomic structure of many elements. Back
in the mid 1800ís, scientists explored this 'colored fire'
phenomena, diffracting the light from the flame using a prism and
creating a series of spectral lines. The lines were measured, with
their wavelength/frequency calculated from the diffraction geometry
and used this information to learn about the energy states of the
electron shells. Spectrographs were one of the first tools used to
characterize the atomic structure of many elements.
 Most
of the spectral lines lie in the ultraviolet range. Common glass absorbs
UV radiation, so prisms used in early spectrometer had to be manufactured
from quartz. Today, prisms have been replaced by reflection gratings,
which perform the same function of separation of the spectral lines.
In addition, much radiation is absorbed by air, requiring the spectrometer
to be evacuated, with the radiation transmitted through high purity
(99.999%) argon. Most
of the spectral lines lie in the ultraviolet range. Common glass absorbs
UV radiation, so prisms used in early spectrometer had to be manufactured
from quartz. Today, prisms have been replaced by reflection gratings,
which perform the same function of separation of the spectral lines.
In addition, much radiation is absorbed by air, requiring the spectrometer
to be evacuated, with the radiation transmitted through high purity
(99.999%) argon.
 The
temperature of a simple flame is too low to vaporize all the elements
to produce the full compliment of spectral lines. Spectrometers use
an electric spark to obtain full vaporization and create a plasma
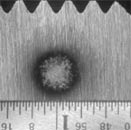
of all the elements. The arc/spark process consumes a small portion
of the sample during the vaporization, leaving a small dark rough
spot on the sample that looks like a burned area. For this reason,
running an OES is often called "burning" or "sparking"
a sample. The
temperature of a simple flame is too low to vaporize all the elements
to produce the full compliment of spectral lines. Spectrometers use
an electric spark to obtain full vaporization and create a plasma
of all the elements. The arc/spark process consumes a small portion
of the sample during the vaporization, leaving a small dark rough
spot on the sample that looks like a burned area. For this reason,
running an OES is often called "burning" or "sparking"
a sample.
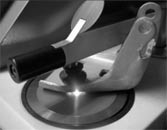
"Sparking" a sample using
OES (left), and arced spot from OES analysis (right).
  
 Once the intensities of the spectral lines are measured by the CCDs,
the values are converted into weight percentages of the element in
the sample. This calculation has been performed in spectrometers by
computers since the 1960ís. With the advances in computer technology,
spectrometers have become smaller and faster. Our OES is run by a
Windows-based computer, providing us with an output that is typical
of any Windows computer software packages.
 The computer has a library containing the chemical composition of
several hundred of the most common materials, to which we can easily
add any materials we desire. After a spectrum is generated, the library
allows for easy matching up grades of steel, aluminum and copper alloys-
for easily determining if the sample meets the specification requirements
and is "in spec".
 To
support the testing, we have a wide range of standards covering all
of the material types and many of the most common alloy grades. These
are samples of where the composition is exactly known and certified
by an organization such as NIST (the National Institute of Standards).
Measurements are checked against these known standards on a daily
basis to insure accuracy. To
support the testing, we have a wide range of standards covering all
of the material types and many of the most common alloy grades. These
are samples of where the composition is exactly known and certified
by an organization such as NIST (the National Institute of Standards).
Measurements are checked against these known standards on a daily
basis to insure accuracy.
 MEi
also participates in a collaborative testing program where unknown
samples are analyzed and the results are compared to the results of
the dozens of other laboratories analyzing identical samples. MEi
also participates in a collaborative testing program where unknown
samples are analyzed and the results are compared to the results of
the dozens of other laboratories analyzing identical samples.
 Please
call if you have any question about our new OES, and how that might
be beneficial to you. Please
call if you have any question about our new OES, and how that might
be beneficial to you.
MEi Alloy Capabilities
We can analyze the following types of materials:
Steels: including all carbon and alloy steels, free machining
(leaded, resulfurized) boron containing, tool steels, stainless steels,
high temperature alloys including some Inconels and high temperature
alloys. The samples can be castings or wrought alloys.
Aluminum: All aluminum based materials- including all common
aluminum association (AA) bar and sheet alloy (1000 through 7000 series
such as 6061, 2024, 3004) and cast alloys (100 to 300 series, such
as 356 or 380).
Copper: All copper based alloys, cast and wrought, brasses,
bronzes.


 Materials
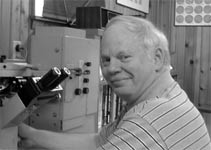
Engineering, Inc is pleased to announce the addition of Terry J. Baldwin
to our technical staff as a Senior Metallographer. Terry brings to
us over 28 years of experience in commercial metallurgical laboratories.
Most recently Terry was a Senior Metallographer with Conam Kawin (formerly
Charles Kawin Company) of Glendale Heights, Illinois, where he spent
11 years providing metallurgical services to a wide range on customers.
Prior to his tenure at Kawin, he spend 17 years with Material Research
Laboratory of Glenwood, Illinois, a commercial metallurgical laboratory
that specialized in metallography, fracture mechanics and mechanical
testing which closed its doors in 1991with the retirement of its owner,
Dr. Ed Ripley. Materials
Engineering, Inc is pleased to announce the addition of Terry J. Baldwin
to our technical staff as a Senior Metallographer. Terry brings to
us over 28 years of experience in commercial metallurgical laboratories.
Most recently Terry was a Senior Metallographer with Conam Kawin (formerly
Charles Kawin Company) of Glendale Heights, Illinois, where he spent
11 years providing metallurgical services to a wide range on customers.
Prior to his tenure at Kawin, he spend 17 years with Material Research
Laboratory of Glenwood, Illinois, a commercial metallurgical laboratory
that specialized in metallography, fracture mechanics and mechanical
testing which closed its doors in 1991with the retirement of its owner,
Dr. Ed Ripley.
  Terry
will be in charge of most of our laboratory testing, including Rockwell
and Brinell hardness, Knoop and Vickers microhardness, metallographic
preparation, microphotography, microstructural analysis and optical
emission spectroscopy. Terry is also being trained as a scanning electron
microscope (SEM) operator, and will be conducting SEM/EDS analysis
in the near future. Beyond the laboratory testing which he will have
prime responsibilities, he will also be supporting the engineers on
staff in failure analysis, processing problems and research projects. Terry
will be in charge of most of our laboratory testing, including Rockwell
and Brinell hardness, Knoop and Vickers microhardness, metallographic
preparation, microphotography, microstructural analysis and optical
emission spectroscopy. Terry is also being trained as a scanning electron
microscope (SEM) operator, and will be conducting SEM/EDS analysis
in the near future. Beyond the laboratory testing which he will have
prime responsibilities, he will also be supporting the engineers on
staff in failure analysis, processing problems and research projects.
 Terry
lives in Plainfield, with his wife Debbie of 31 years. Debbie teaches
7 grade mathematics in the Joliet school system. They have 3 children.
Terry and Debbie enjoy camping, fishing, gardening, woodworking and
church related activities. Terry
lives in Plainfield, with his wife Debbie of 31 years. Debbie teaches
7 grade mathematics in the Joliet school system. They have 3 children.
Terry and Debbie enjoy camping, fishing, gardening, woodworking and
church related activities.
 Help
us welcome Terry to Material Engineering, Inc. Help
us welcome Terry to Material Engineering, Inc.


 Materials
Engineering, Inc. now offers conductivity measurement, using KJ Law
Verimet M4900C. This device works on eddy current principals, with
the procedures described in ASTM E1004 "Determining Electrical
Conductivity Using the Electromagnetic Method" and can determine
the conductivity of non-magnetic materials. A half inch round probe
is placed on the sample, providing a direct measurement. The only
requirements are that a sample be larger than the probe and at least
0.060" thick. Conductivity is typically measured in %IACS. This
is a unitless engineering scale established by rating pure copper
at 100%, and comparing the measured conductivity to that of copper.
IACS stand the international copper standard, and can be converted
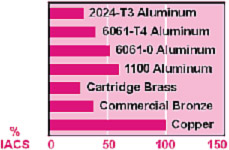
to other values by simple multiplication. Conductivity of common metals
are tabulated below. Materials
Engineering, Inc. now offers conductivity measurement, using KJ Law
Verimet M4900C. This device works on eddy current principals, with
the procedures described in ASTM E1004 "Determining Electrical
Conductivity Using the Electromagnetic Method" and can determine
the conductivity of non-magnetic materials. A half inch round probe
is placed on the sample, providing a direct measurement. The only
requirements are that a sample be larger than the probe and at least
0.060" thick. Conductivity is typically measured in %IACS. This
is a unitless engineering scale established by rating pure copper
at 100%, and comparing the measured conductivity to that of copper.
IACS stand the international copper standard, and can be converted
to other values by simple multiplication. Conductivity of common metals
are tabulated below.

 Conductivity
is another tool used to characterize metals. Its most common use is
on aluminum alloys to differentiate between alloys and tempers as
a quality control acceptance tool. Different aluminum alloys or different
tempers (T4, T6) have difference conductivities, allowing conductivity
to be a good tool for sorting. Conductivity
is another tool used to characterize metals. Its most common use is
on aluminum alloys to differentiate between alloys and tempers as
a quality control acceptance tool. Different aluminum alloys or different
tempers (T4, T6) have difference conductivities, allowing conductivity
to be a good tool for sorting.
 While
conductivity is a rather specialized test that not everyone will use,
we have had numerous inquires about conductivity testing through the
years, causing us to add this method to our capabilities. We are always
interested in your comments on test methods you would like to see
us offer to serve you better. While
conductivity is a rather specialized test that not everyone will use,
we have had numerous inquires about conductivity testing through the
years, causing us to add this method to our capabilities. We are always
interested in your comments on test methods you would like to see
us offer to serve you better.


 This
past year, MEi successfully passed a quality audit by the American
Association for Laboratory Accreditation (A2LA) meeting the quality
requirements of ISO/IEC 17025, "General Requirements for the
Competence of Testing and Calibration Laboratories", which replaces
the less stringent Guide 25. The new specification combines the controls
necessary to insure technical competency in a test lab with quality
requirements consistent with ISO 9000. Labs that comply with ISO 17025
also operate in accordance with ISO 9001 and 9002 by definition. This
past year, MEi successfully passed a quality audit by the American
Association for Laboratory Accreditation (A2LA) meeting the quality
requirements of ISO/IEC 17025, "General Requirements for the
Competence of Testing and Calibration Laboratories", which replaces
the less stringent Guide 25. The new specification combines the controls
necessary to insure technical competency in a test lab with quality
requirements consistent with ISO 9000. Labs that comply with ISO 17025
also operate in accordance with ISO 9001 and 9002 by definition.
 There
are many new requirements in this specification: There
are many new requirements in this specification:
 Laboratories
must participate in collaborative testing for all test methods that
such testing is offered. Collaborative testing compares the testing
results from numerous labs on identical samples, assessing technical
competency. Laboratories
must participate in collaborative testing for all test methods that
such testing is offered. Collaborative testing compares the testing
results from numerous labs on identical samples, assessing technical
competency.
 Tighter
controls are placed on subcontracted testing and calibration. Any
testing that is not performed in house can only be subcontracted to
a laboratory that is also accredited to ISO 17025. Tighter
controls are placed on subcontracted testing and calibration. Any
testing that is not performed in house can only be subcontracted to
a laboratory that is also accredited to ISO 17025.
All measurements, calibrations and verifications must be traceable
to NIST (National Institute of Standards Technology).
 Uncertainty
of measurement must be established for each applicable test method.
All sources of measurement uncertainty must be calculated or estimated.
This is generally done using gauge R&R or similar statistical
methods. Uncertainty
of measurement must be established for each applicable test method.
All sources of measurement uncertainty must be calculated or estimated.
This is generally done using gauge R&R or similar statistical
methods.
 As
with any audit, beyond passing and meeting the detailed requirements,
we believe the true value is in taking an introspective look at your
organization, test methods and internal quality control so that an
organization can determine how it is doing and how it can improve.
With this in mind, our quality manuals and our internal procedures
were reviewed in detail and upgraded to meet the requirements of the
new specification, and to continue to provide you with the highest
competency in materials testing. As
with any audit, beyond passing and meeting the detailed requirements,
we believe the true value is in taking an introspective look at your
organization, test methods and internal quality control so that an
organization can determine how it is doing and how it can improve.
With this in mind, our quality manuals and our internal procedures
were reviewed in detail and upgraded to meet the requirements of the
new specification, and to continue to provide you with the highest
competency in materials testing.
 If
your testing must meet A2LA ISO 17025 requirements, please let us
know when you submit the samples. If
your testing must meet A2LA ISO 17025 requirements, please let us
know when you submit the samples.


 If
you have not asked, you may not be aware that we can now provide our
reports in a fully electronic format. This is convenient for centralized
storage of data in many companies, or easy transmittal to your other
plant sites or customers, especially if they are overseas. If
you have not asked, you may not be aware that we can now provide our
reports in a fully electronic format. This is convenient for centralized
storage of data in many companies, or easy transmittal to your other
plant sites or customers, especially if they are overseas.
 We
have digital photography for macrophotography, on the stereomicroscope
(10x-90x) on the metallurgical microscope (45x to 1000x) and on the
scanning electron microscope (35x to many thousand times). Our energy
dispersive spectrograph (EDS) spectra can also be produced in digital
image form. This allows us to provide you with a completely digital
report. We
have digital photography for macrophotography, on the stereomicroscope
(10x-90x) on the metallurgical microscope (45x to 1000x) and on the
scanning electron microscope (35x to many thousand times). Our energy
dispersive spectrograph (EDS) spectra can also be produced in digital
image form. This allows us to provide you with a completely digital
report.
 We
write all our reports using Microsoft Word software. Depending on
the number of photographs and spectra, the electronic report files
may be several thousand kb in size. If the report contains only one
or two images, we will e-mail you the report in MS Word .doc format.
If the report contains more photographs, we will save the report as
an Adobe Acrobat PDF file, and will e-mail you the much smaller .pdf
format file. As there is always the risk of losing the electronic
report, we will save the report files (in both pdf and doc formats)
to a compact disk, and mail you the CD. This way, you will always
have a back up copy in your file, just in case your hard drive should
crash. We
write all our reports using Microsoft Word software. Depending on
the number of photographs and spectra, the electronic report files
may be several thousand kb in size. If the report contains only one
or two images, we will e-mail you the report in MS Word .doc format.
If the report contains more photographs, we will save the report as
an Adobe Acrobat PDF file, and will e-mail you the much smaller .pdf
format file. As there is always the risk of losing the electronic
report, we will save the report files (in both pdf and doc formats)
to a compact disk, and mail you the CD. This way, you will always
have a back up copy in your file, just in case your hard drive should
crash.
 Our
only concern with electronic reports is the use of magnifications
with the images. The magnifications reported with the images are based
upon a print out of the report on a standard 8.5 by 11 sheet of paper.
Please use caution and do not scale off the images as displayed on
your computer screen. Our
only concern with electronic reports is the use of magnifications
with the images. The magnifications reported with the images are based
upon a print out of the report on a standard 8.5 by 11 sheet of paper.
Please use caution and do not scale off the images as displayed on
your computer screen.
 Our
default will continue to be to provide you with a hard copy report,
with original photographs. If you want to receive your report in a
electronic format, please let us know at the time you submit the samples.
Similarly, if you (and anyone else in your company) want to switch
over exclusively to electronic reports in the future, just e-mail
us and let us know. Our
default will continue to be to provide you with a hard copy report,
with original photographs. If you want to receive your report in a
electronic format, please let us know at the time you submit the samples.
Similarly, if you (and anyone else in your company) want to switch
over exclusively to electronic reports in the future, just e-mail
us and let us know.
 Please
contact us if you have any thoughts on how we can make electronic
report formats work for you. Please
contact us if you have any thoughts on how we can make electronic
report formats work for you.


 We
have recently published a new brochure summarizing our services and
capabilities, in a compact tri-fold format, which have already been
mailed to some of you. Please call us if you would like to receive
your copy. We
have recently published a new brochure summarizing our services and
capabilities, in a compact tri-fold format, which have already been
mailed to some of you. Please call us if you would like to receive
your copy.


 Just
a reminder that our zip code changed last year to 60151 when the Virgil
post office closed. This closure also forced us to discontinue the
use of our P.O. Box. Please verify that you have deleted our P.O box
and have the correct zip code, and double check with others in your
organization to insure the information is correct in vendor databases,
purchasing records, shipping documents and accounts payable files.
Thank You. Just
a reminder that our zip code changed last year to 60151 when the Virgil
post office closed. This closure also forced us to discontinue the
use of our P.O. Box. Please verify that you have deleted our P.O box
and have the correct zip code, and double check with others in your
organization to insure the information is correct in vendor databases,
purchasing records, shipping documents and accounts payable files.
Thank You.


 In past issues, this back page has always been devoted to our photo
identification contest, in which we would take a look at a common
everyday object that should be familiar to all of you in the scanning
electron microscope (SEM) at high magnification and ask you to guess
"what is it?"
 In
this issue, we try something different having to do with the application
of metallurgical engineering to one of the most familiar things in
everyday life: Money. Most of know that a nickel isn't really made
of nickel, but do you know what it is really made of? Test your knowledge
(or guessing ability) by matching up the past and present compositions
of the four common US coins. Just match the compositions with their
proper coins, quarter, dime, nickel, or penny. In
this issue, we try something different having to do with the application
of metallurgical engineering to one of the most familiar things in
everyday life: Money. Most of know that a nickel isn't really made
of nickel, but do you know what it is really made of? Test your knowledge
(or guessing ability) by matching up the past and present compositions
of the four common US coins. Just match the compositions with their
proper coins, quarter, dime, nickel, or penny.
Past Compostition
A) 75% copper, 25% nickel
B) 90% silver, 10% copper
C) 95% copper, 5% zinc
D) 90% silver, 10% copper
Current Composition
W) 97% zinc, 3% copper
X) 92% copper, 8% nickel
Y) 92% copper, 8% nickel
Z) 75% copper, 25% nickel
 Please
fax, mail or e-mail us (don't call) with your answer. We will draw
a winner from all correct entries received by April 15. The correct
answer and winner will be published in the next issue "Of Materials
Interest". The prize is a $50 gift certificate to a restaurant
of your choice, so put your thinking caps on. Please
fax, mail or e-mail us (don't call) with your answer. We will draw
a winner from all correct entries received by April 15. The correct
answer and winner will be published in the next issue "Of Materials
Interest". The prize is a $50 gift certificate to a restaurant
of your choice, so put your thinking caps on.
Results:
 Unfortunately
no one identified the sharp item in our last issue as the tip of a
fishing hook. With the clue of 'something many of you have first hand
experience with, especially on summer vacation' the most popular entry
was a mosquito stinger. This shows us shows what kind of vacations
you have been having the past summers. By the way, the fishing hook
was suggested by Beran Black, whom many of you remember as a material
engineer that left our company a few years back, "retiring"
to Vermont where she is spending lots of time fishing with her school
age children. Unfortunately
no one identified the sharp item in our last issue as the tip of a
fishing hook. With the clue of 'something many of you have first hand
experience with, especially on summer vacation' the most popular entry
was a mosquito stinger. This shows us shows what kind of vacations
you have been having the past summers. By the way, the fishing hook
was suggested by Beran Black, whom many of you remember as a material
engineer that left our company a few years back, "retiring"
to Vermont where she is spending lots of time fishing with her school
age children.
 Since
we had no winner last time, we will award two prizes for this issue's
contest. Since
we had no winner last time, we will award two prizes for this issue's
contest. |


